Can you paint pressure treated wood? Yes, of course!
But it’s the technique that counts. Most often, people rush the job and end up with a project that looks fine for a day, just before it starts sliding. Often, it’s just weeks after getting the perfect finish on the fence, deck, or railing.
What they miss is knowing when the wood is ready to hold the paint.
That’s why you need professional painters like Paintman NYC, who don’t rely on guesswork. We take the time to check the moisture levels, weather conditions, sun exposure, and everything else that can affect how long the paint will last before we get on to the job.
In this guide, let’s learn when to paint the pressure treated wood and how to make sure it lasts.
What is Pressure-Treated Wood?
Pressure-treated wood is a unique kind of wood infused under high pressure with waterborne preservatives. These protect the wood from fungi, rot, and insects, but also leave a high moisture content of about 30% to 50% inside it.
Painting this type of wood too soon will trap the moisture inside, and as it dries, the trapped moisture will push outward. The result? You get bubbling, peeling, and cracking paint.
As per most professionals and the U.S. Forest Products Laboratory (USDA), “ressure-treated wood must be allowed to dry sufficiently before finishing”. Hence, as per industry practice, it is recommended to wait until the moisture content drops to around 15% or lower.
When Can You Paint Pressure Treated Wood?

We come to the biggest question: When can you paint pressure-treated wood? If you ask most people, they’ll agree to a timeline between 30 days and six months.
30 Days, 90 Days, or 6 Months?
The 30-day wait period works when the weather is hot and dry. The wood gets good exposure to sunlight and air and dries well within the time for paint.
However, it’s better to wait for 3 to 6 months. That’s because by this time, the wood has reached the minimal moisture levels needed for the paint to stick.
But there are other factors that must be considered. Like, thick boards take longer to dry, or when the wood is in a shaded or poorly ventilated area, it’ll take much longer to dry. This is why many professionals set a default timeline of 3 to 6 months before getting to the paint job.
The “Water Test”
Many professional painters use a field trick also called the “water test.” They place a few drops of water onto the wood and see how it behaves. If it beads up, it means the wood is not ready. However, if it is absorbed within 10 minutes, the wood is ready to be painted.
The science behind it? Simple: Dry wood pulls moisture inside, and wet wood repels it. So water droplets get absorbed if the wood is dry, meaning you can go ahead with the paint job.
Other Factors on the Professionals’ Checklist Before Painting
The professional painters also use the moisture meter to detect the moisture level inside the wood. Ideally, it must be less than 15% before they get to painting.
These experts also took into account the sun exposure, as the south-facing side of a structure usually dries faster. They check for the airflow around the structure as ventilation can speed up drying too. They also take into account the type of pressure treatment, which can affect how much moisture the wood retains.
Another sign that the wood is ready to be painted is that the color changes from a greenish tint to a dull brown or grey. However, that alone is not a reliable measure of the wood being ready to be painted.
How Soon Can You Paint Pressure Treated Wood
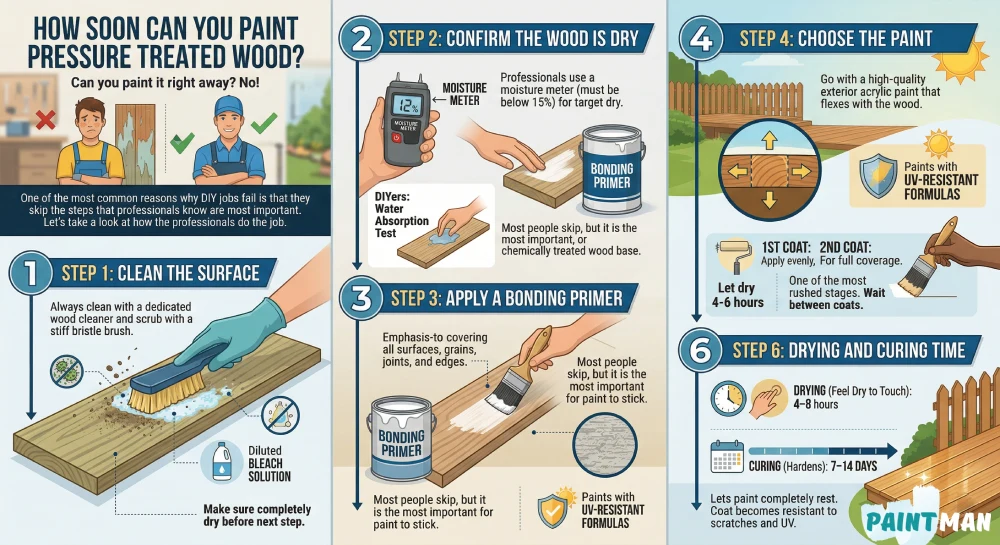
Can you paint pressure treated wood right away? No!
One of the most common reasons why DIY jobs fail is that they skip the steps that professionals know are most important. Let’s take a look at how the professionals do the job.
Step 1: Clean the Surface
As a DIY painter, it is tempting to get on with the paint job as soon as it’s dry. But if you paint wood that has dust or dirt all over, it will fail and that too much sooner than you’d expect.
Always clean it with a dedicated wood cleaner and scrub the surface with a stiff-bristle brush. In case of mildew or mold, use a diluted bleach solution and rinse thoroughly. Make sure the surface is completely dry before proceeding to step 2.
Step 2: Confirm the Wood Is Dry
The professionals usually use a moisture meter to check if the wood is actually dry.
They don’t go by timelines or hunches. The moisture meter must show a target below 15% for them to go ahead with the paint job.
As a DIY painter you may conduct the water absorption test and then proceed with the job.
Step 3: Apply a Bonding Primer
Most people skip the step, but it is the most important step for the paint to stick. Always apply a primer to the pressure treated wood. Make sure to touch all surfaces and pay special attention to the grains, joints, and edges.
It is best to use a bonding primer which sticks well onto weathered, smooth, or chemically treated wood and creates a base for the topcoat to sit on.
Step 4: Choose the Paint
Go with a high-quality exterior acrylic paint that flexes (contracts and expands) with the wood during weather changes. This helps prevent cracking over time.
For increased protection, you can also go for paints with UV-resistant formulas, which don’t fade or get damaged by the sun’s exposure.
Step 5: Apply Paint Properly
One of the most rushed stages of painting is the job itself.
Always apply the first coat evenly. Do not overload the brush or roller. Let it completely dry before you get onto the second coat. Give it at least 4-6 hours to dry and then apply the second coat for full coverage.
Step 6: Drying and Curing Time
Let the paint completely dry and cure before you use the deck or fence,etc.
Drying can take around 4-8 hours. It is when the paint begins to feel dry to the touch.
Curing, on the other hand, is the process by which the paint hardens. It can take 7–14 days for exterior acrylic paints to dry. But it is an important step, as when the paint is allowed to rest this long, the coat becomes resistant to scratches and UV exposure.

Final Word

So, can you paint pressure-treated wood? Short answer, yes. But it’s only if you respect what the wood is telling you.
The trick is: Do not jump into it. Pressure-treated wood needs its time to dry.
Thereafter, it needs a proper prep, the right paint, drying time, and a lot of patience. At Paintman NYC, we assess moisture content and environmental conditions and prepare the surface before paint touches the wood.
Our paint job doesn’t just look good on day one; it is meant to last. No peeling, no bubbling, no shortcuts. Call us today because this is what we do every day.

Mychal Diachenko
Mychal Diachenko, Author at Paintman NYC blog. Started Paintman NYC company and has been painting for more than 10 years throughout Europe and New York City. Since 2017, he has created a family-run painting company that people trust and that is recognized for doing a great job painting apartments all around New York.